


Having a blog is a crucial aspect of various online marketing approaches as it involves regularly posting content to enhance search engine visibility and draw in new visitors keen on your topics. This makes it a vital step for individuals looking to venture into digital marketing, particularly inbound marketing.
WordPress can serve as a valuable tool for publishing your blog, being the leading content management system utilized by more than 30% of all websites online. It is cost-free and offers a wide range of support resources generated by individuals worldwide.
If you’re reading this article, you likely believe that WordPress is the ideal platform for building your blog. 🙂
Learn how to set up a WordPress blog from choosing a domain to publishing it with our tutorial. Additionally, we’ll provide post-publication tips. Stick with us to get all the details!
Choosing the WordPress version for your site: installed (.org) or hosted (.com)

In WordPress, it’s crucial to understand that the platform has two main types: the self-hosted version found on wordpress.org, and the hosted version on wordpress.com.
The current version is available for free download from the WordPress.org website. This allows you to download the source code and install WordPress on your desired hosting sites. While you would be in charge of platform maintenance, some companies provide WordPress hosting services with automatic updates and expert assistance.
WordPress offers a hosted version on their website, where Automattic handles all maintenance tasks, including upgrades, updates, and hosting. Users can choose between a free basic plan or a paid plan with additional features like a custom domain and advanced customization options.
When to opt for hosted WordPress (.com)
WordPress hosted (.com) is ideal for anyone.
- Create a website or blog for free and then grow with it.
- You wish to make your own website but lack expertise in design or programming.
- Look for ease and efficiency in handling your website by consolidating everything into a single service.
- You prefer to concentrate on the content and design of the website while entrusting the technical aspects like hosting, maintenance, and backups to the service provider.
- You want to provide assistance for your questions.
- I just want to experiment with WordPress without needing to invest anything other than the time to get started.
When selecting WordPress installed (.org)
WordPress (.org) installation can be the most appropriate choice for anyone.
- Do you desire complete independence and authority over your website?
- You aim to build your own website and possess technical skills (or are open to acquiring the required knowledge).
- Customize your blog extensively by altering themes, using plugins, or creating your own theme.
- It aims to streamline site management by selecting various services from different providers, if needed (such as hosting, domain, themes, etc.).
- Whether you are earning money from your blog through AdSense advertisements or other platforms.
- You are comfortable with occasionally editing code yourself or having someone else do it for you.
- Install third-party themes and plugins on WordPress without the need to subscribe to a plan.
- You prefer to cover the costs of hosting and domain without utilizing WordPress.
- Create an affordable website that is both simple and professional, with the option to grow and develop it as needed in the future.
We choose WordPress (.org) for its flexibility and customization options, which may not be the ideal choice for everyone. It’s important to assess which option suits your needs best.
Let’s now look at the detailed steps for creating a WordPress blog, covering both versions of the platform. To get started quickly, click on one of the links below.
- Creating a WordPress blog that is installed (.org)
- Creating a WordPress blog hosted on (.com)
Creating a WordPress blog installed (.org)

This WordPress version from wordpress.org requires installation on a hosting platform to function. Setting up the environment for your blog’s operation is a necessary step before proceeding with the straightforward installation process. Follow the steps provided to learn more.
Choose a domain and hosting for Step 1.
Having a domain and hosting are essential for setting up and sharing your WordPress blog online. In a real-world comparison, the domain is like the address, while hosting is akin to the physical establishment.
Both can be bought together or individually from the same company. Once the domain is registered, it can be directed to any hosting server, regardless of where it was registered.
To gain a deeper understanding of the distinctions between the two, refer to these articles on domain and hosting.
Selecting the domain
The domain is a crucial element in any online project, such as a blog, website, virtual store, or app. It serves as your internet address and should be linked to your brand. For example, if you’re launching a blog named Lu Blog, it would be wise to secure the domain blogdalu.com.br.
Carefully selecting your blog’s domain is crucial for its longevity if things go smoothly. To learn more, check out the article on selecting a domain for your website. Also, consider our list of recommended domain extensions for blogs, as a domain comprises not just the name but also the extension.
If you are prepared to select your domain, you can consult the list of top companies for domain registration.
Selecting web hosting services
Hosting is like the home for your blog, where you store all your content, including WordPress, and ensure your blog is accessible to all visitors no matter where they are.
Different types of hosting are available for blogs of all sizes and budgets. You can easily create a WordPress blog with affordable hosting options, such as starting for less than twenty real per month.
Shared hosting is the most recommended option for beginners, as it is cost-effective and ensures privacy for each client’s files and data within a separate server area.
After booking the lodging, you will be provided with instructions on linking the domain to the hosting service. If the services were purchased together from the same provider, this setup is likely to be prearranged. Otherwise, you will need to direct the domain to the hosting service, which is a straightforward process usually supported with ample guidance materials by hosting companies.
Check our list of top hosting companies for special discounts of up to 75% when selecting your hosting provider.
Download WordPress and transfer it to the server.
After obtaining the domain and hosting services, we can set up WordPress. The installation can be done manually or using an automatic installer tool provided by many hosting providers. Here, we will focus on manually installing the platform.
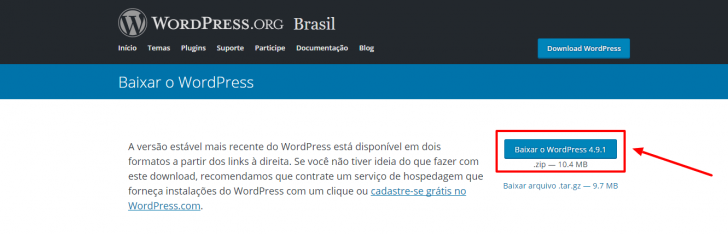
Go to the official WordPress website at wordpress.org and click on the Download WordPress button to obtain the .zip file containing WordPress by following the provided instructions.
Save the file on your computer, extract its contents, and then send the extracted files to the hosting server. Alternatively, you can send the zipped file to the server and extract it there, but for this guide, we prefer sending the already extracted files to the hosting server.
To complete the transfer, you will require an FTP program, which is used for file transfers between computers and servers. There are numerous free options available, and for this task, we will utilize the Filezilla program.
After installing, launch Filezilla and access Site Manager by clicking on File -> Site Manager (or the designated button shown in the image).

Click on “New Site” and enter the Host, User, and Password details using the information provided to you when your hosting was activated. Refer to the example in the image for guidance.
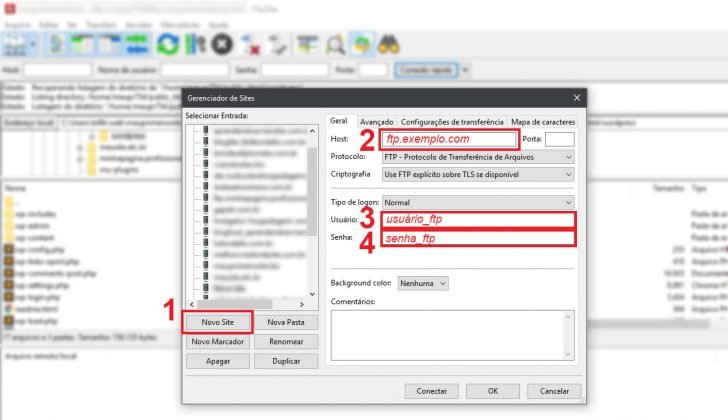
Click the Connect button after filling in the data correctly to establish a connection between your computer and the hosting server using the FTP program.
In the program window, files from your computer are shown on the left, while server files are displayed on the right. To transfer files, you must first navigate through both windows to locate the directories containing the files you wish to transfer on your computer and the destination directory on the server.
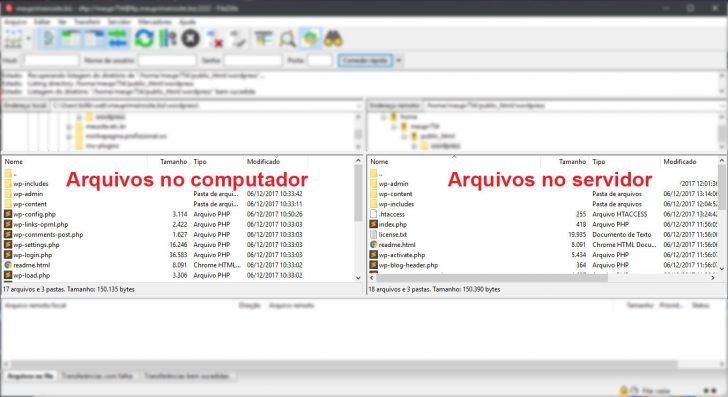
To have your WordPress blog set up on the main domain (e.g., myblog.com), move the files to the root directory of the hosting folder, typically named public_html on the server, although variations like www or httpdocs are also common. Refer to your hosting documentation for further assistance.
If you wish to have your blog set up in a subfolder of your website domain (for example, mysite.com/blog), you must create a folder and move the files into it.
WordPress can be set up in a subfolder on your domain and then configured to appear as if it is installed on the main domain. The process for this setup will not be discussed here.
Step 3 involves establishing a database.
After transferring the WordPress files to the server, the next step is to set up a database. This database will store all site data, such as the installation details, configurations, and the content like posts and pages.
The original database utilized in WordPress is MySQL, which is commonly found in many CMS platforms. Although other databases can be used, we will stick with MySQL.
Database creation in the majority of hosting companies can be accomplished through the hosting control panel. While the interface may vary depending on the provider, the fundamental process for creating a database remains consistent.
At the conclusion of the procedure, you will possess the subsequent details (remember them for future use):
- Name of the database
- Username
- Passcode
- Database location
The address often used is “localhost,” which means the database is on the same server. Some companies may have separate servers for their database, in which case the address will be like “mysql.domain.with.” Check your hosting company’s documentation for more information.
Establishing the database
We will demonstrate how to create the database using the MySQL® Database Wizard, available in any hosting with the cPanel control panel.
Select a name for the database after considering the existing prefix displayed in the image. The prefix cannot be modified. Input your preferred name and proceed by clicking “Next Step”.

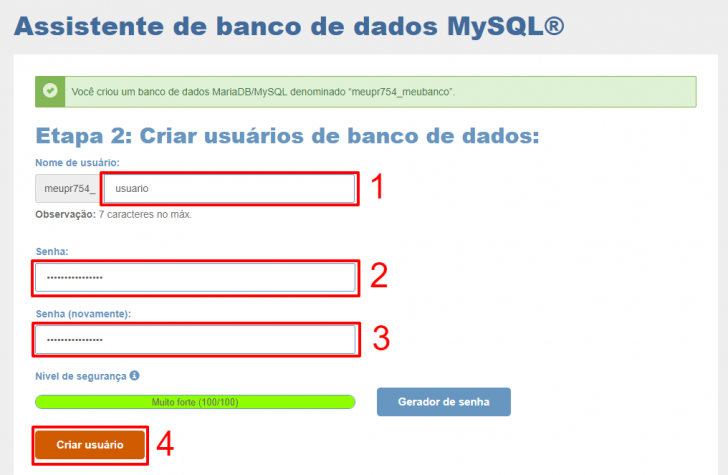
Create the bank username and password during this step, along with receiving an unchangeable prefix similar to when setting up the bank account. Enter your desired username and proceed to the next section.
I suggest using the password generator on the website to create a robust password. If that’s not an option, make a 16-character password with a mix of uppercase and lowercase letters, numbers, and special characters. Keep a record of the password, along with the database name and username.
chsyys/KaboomPics
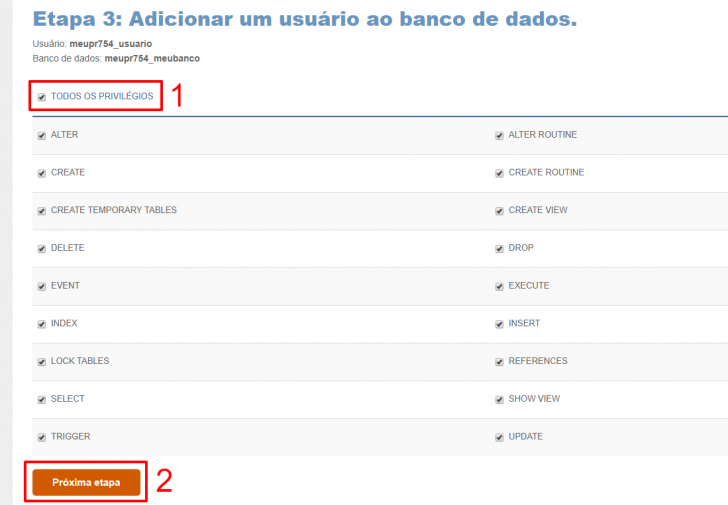
Set user privileges in the database at this stage by selecting the “All privileges” option and proceeding to the next step.
Step 4: This step serves as verification that the database and user have been successfully created. If the process was successful, a screen similar to the one shown below will appear.
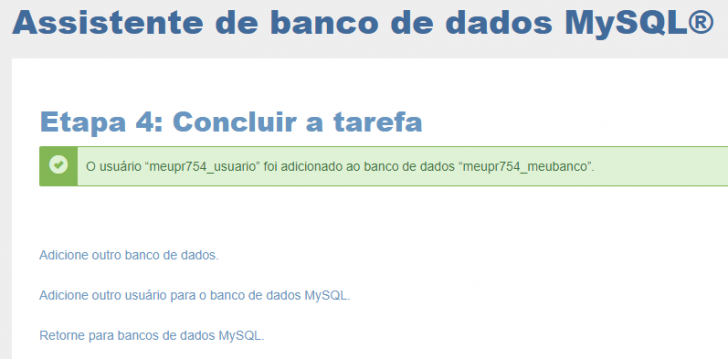
Now that the database has been set up and the information is recorded, we can proceed to the next stage.
Edit the wp-config.php file in Step 4.
The wp-config.php file is essential for WordPress to work properly as it handles the connection between the WordPress installation and the database.
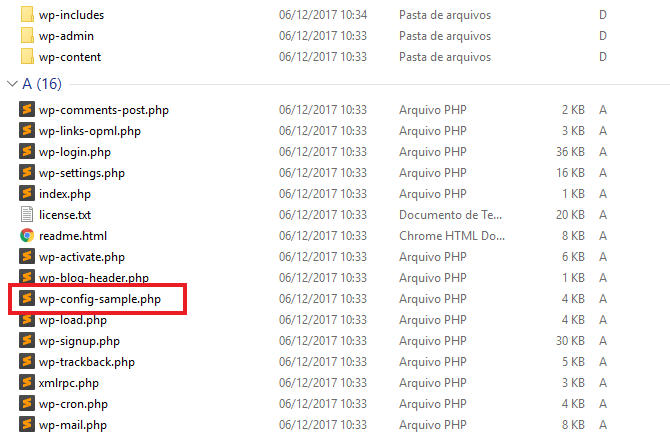
When you access the WordPress directory where you uploaded the files to the server, you will see that the file wp-config.php is not present. Instead, there is a file named wp-config-sample.php, which will be used as a template to create our wp-config.php file.
Open the wp-config-sample.php file using a code editing software. If you don’t have one, use Notepad to open the file.
Look for the database information insertion indication inside the file, which includes comments guiding where to input the required information.
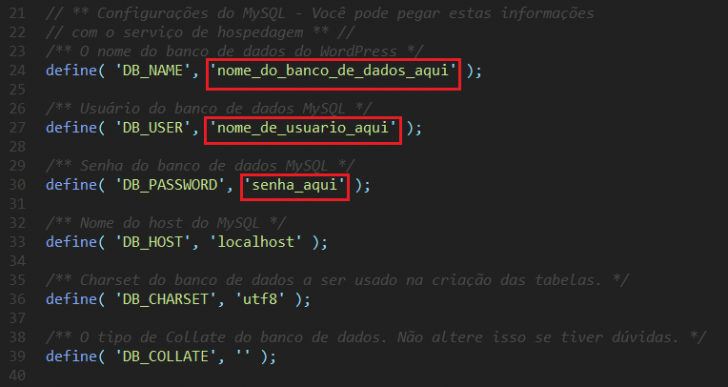
Enter the information you recorded during the database creation process (including the bank name, username, and password) into this document. Ensure that you input the details within the designated section enclosed by single quotation marks. If the database is located on a different server, update the localhost field accordingly.
Rename the file to wp-config.php after editing by removing the -sample.
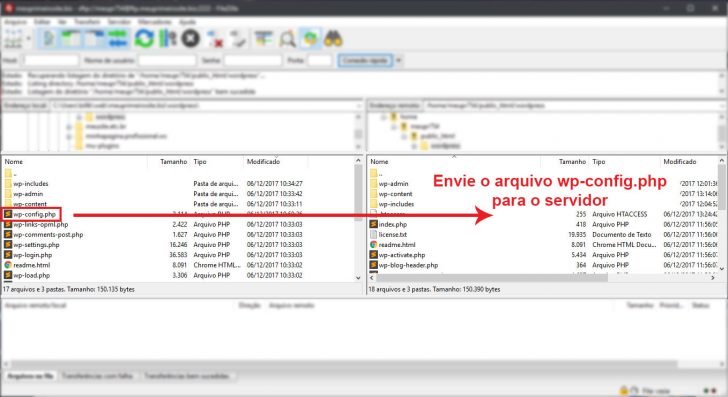
Transfer the wp-config.php file to the server.
Before proceeding with the installation, the final step involves transferring the wp-config.php file to the server using the FTP program used to send the WordPress files.
Open Filezilla and establish a connection to the server using the website manager. Ensure that the WordPress root directories on your computer and the server match by verifying that the folder and file structures are the same on both ends.
Upload the wp-config.php file by double-clicking on it in the left window, and it will then be moved to the server.
Step 5: Complete the installation process.
We have completed all the required procedures to prepare WordPress for installation. The next step is to finish the installation process by visiting the specific address based on where the WordPress files were sent.
If WordPress is installed on the main domain, go to http://www.mydomain.com/wp-admin/install.php.
If WordPress is located in a subdirectory, the installation path would be: http://www.mydomain.com/blog/wp-admin/install.php
Replace “www.mydomain.” with your blog URL and “/blog” with the subdirectory where you uploaded the WordPress files.
If you have an SSL certificate on your domain, include the HTTPS protocol in the URL provided.
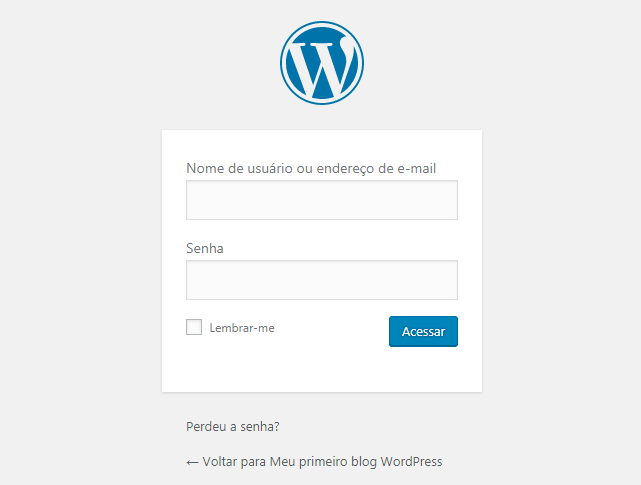
After editing the wp-config.php file correctly, you will encounter the setup screen upon visiting the installation link. Here, you can input the site name, choose a username, provide an email address, and generate a password. WordPress may propose a secure password for you to use, or you can opt to create your own.
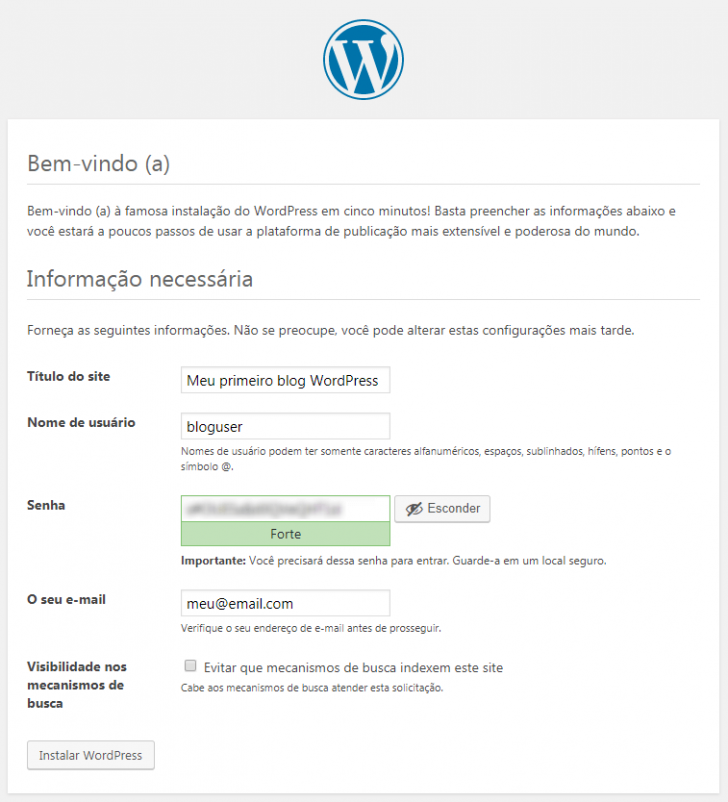
Before you set up WordPress, make sure to record the username and password for future reference. These credentials are essential for logging into the admin panel of your WordPress website.
On this page, you’ll find a setting named “Visibility in search engines.” If you wish for your website to show up in search engine results, like Google, leave this option unchecked. Otherwise, mark it before setting up your blog. This decision can be revisited anytime, even post-installation.
Click the Install WordPress button after completing all the fields to proceed to the confirmation screen.
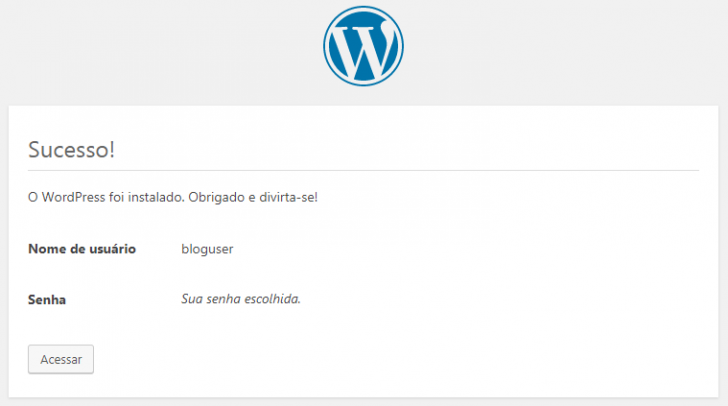
Click on “Access” and then proceed to enter your login credentials on the well-known WordPress login page in order to gain entry to the administrative dashboard of your latest blog.
The WordPress admin panel looks similar to the image below on the initial access.
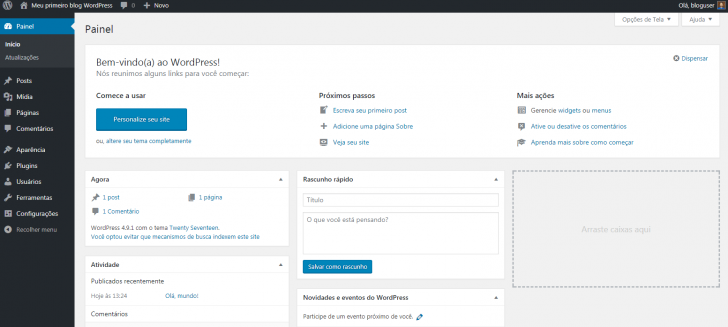
If you have completed all the steps mentioned, you have now successfully launched your WordPress blog. You are now able to customize and publish content.
We will learn how to set up a WordPress blog in its hosted version instead of using a WordPress installation. Let’s explore this option!
Explore also: JetFormBuilder, an introduction to and instructions for utilizing this complimentary WordPress form plugin.
Creating a WordPress blog hosted on .com
Creating a blog on WordPress’s hosted platform is a straightforward process that is user-friendly and intuitive. Automattic manages the infrastructure, allowing users to focus on essential tasks like setting up the site address and creating an account.
The process also involves recommending website domains and names for your upcoming blog. Learn how to set up a WordPress blog on your own hosting platform.
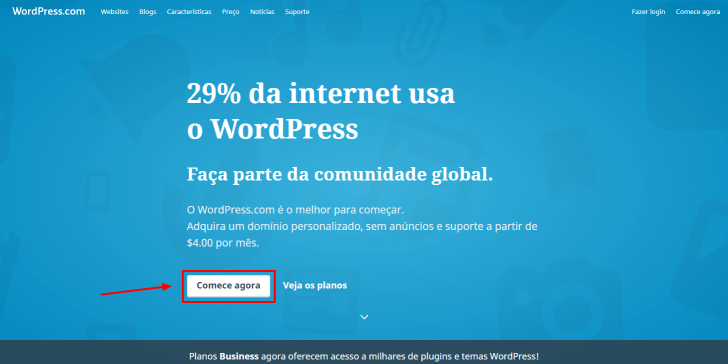
Access WordPress.com and select the website category.
The initial action is to visit the WordPress website and click on the “Start Now” button.
chsyys/ShutterStock
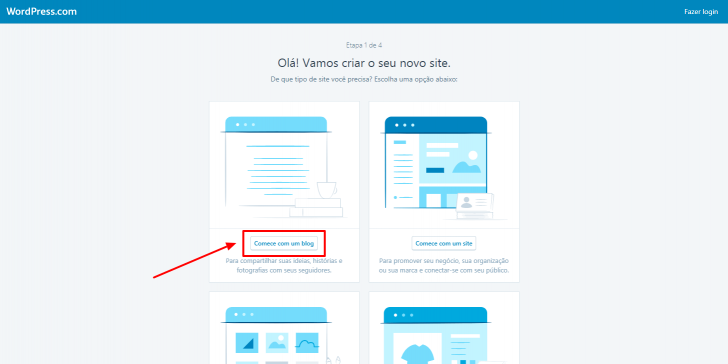
You need to select the type of website you want to create on the following page. In this guide, we will opt for the Blog choice, although the Site, Portfolio, and Online Shop options are also provided.
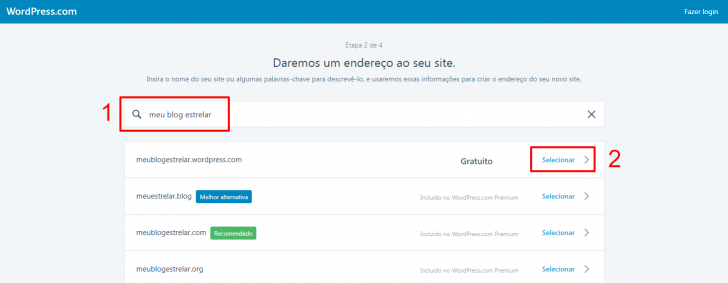
Choose a title for your blog.
Set up an address for your blog by entering a desired name or keyword related to the type of blog you want to create. Suggestions for the blog address will be provided below the input box.
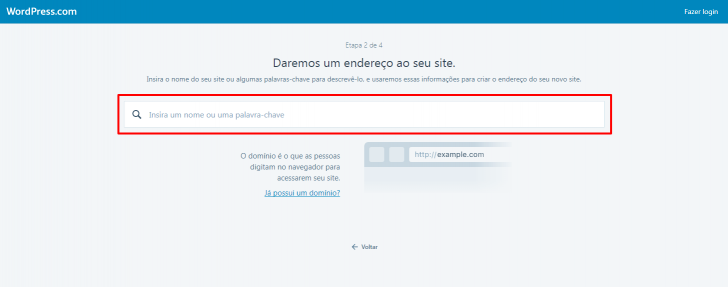
The initial suggestion provided at no cost involves using a subdomain as the address (e.g. myblog.wordpress.com), while additional choices for obtaining a custom domain are also presented.
We will opt for the free choice. It is possible to include a domain later if needed.
Choose a WordPress plan in Step 3.
Automattic provides a selection of 6 plans for hosted WordPress, including free, Blogger, Personal (featuring a custom domain registration), Premium, Business, and eCommerce options.
Each plan includes the characteristics of the previous plan along with extra features. The Business plan, priced at R$ 83 per month, allows users to add third-party themes and plugins. These two plans are the only ones supporting themes and plugins from the WordPress (.org) platform.
In this tutorial, we will continue using the no-cost option. Further details regarding WordPress.com plans can be found on this page.
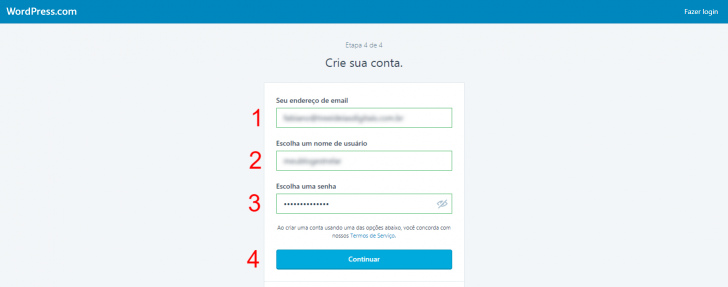
Step 4: Set up your account and you’re all set!
The final stage involves setting up the account by providing an email address, selecting a username, and creating a password. Simply complete the form and then click on “Continue.”
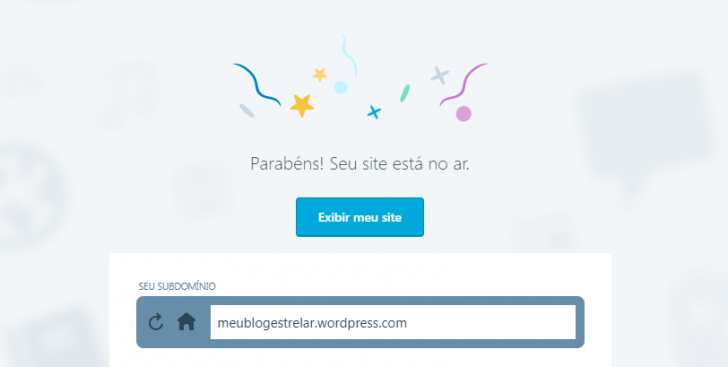
If everything goes as planned, you will encounter a successful screen in the following step. At this stage, you can proceed to access the WordPress admin panel and begin posting content.
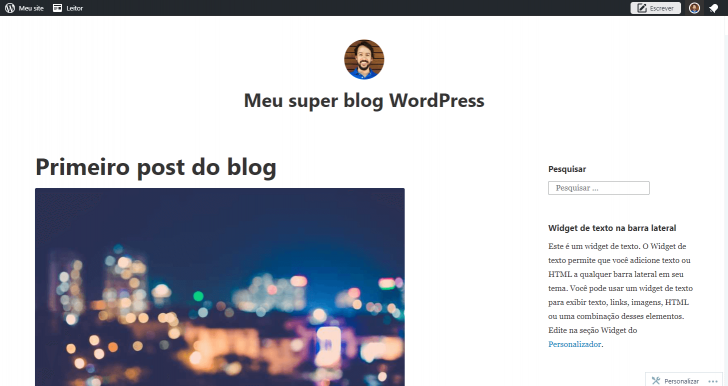
An illustration of content is automatically added to the WordPress blog setup to demonstrate what is possible and how to modify the published content.
After you have set up your WordPress blog, what steps should you take next?
The actions we have observed are just the initial phase in the journey of a blog. Although it may seem insignificant, this starting point is crucial as it signifies the commencement of your blog’s existence.
It’s now time to fully engage in this journey after acquiring the skills to set up a WordPress blog. Here are key steps to help you thrive with your blog.
- Alter the appearance of the blog by installing a personalized template.
- Install plugins to add additional features and functionalities.
- Publish content to begin!
Content production is the most important aspect of a blog, even though it is mentioned last among the actions listed.
Conclusion
WordPress is an excellent tool for building various types of websites, not just blogs, and its popularity is due to its high quality.
Consider utilizing the opportunity to enhance and upgrade your blog by following the advice in a featured article offering 7 tips for creating a professional WordPress website.
Published on 12/12/2017 and last updated on 22/07/2025.
Tags related to tutorials for WordPress.